Products
X


T-Shirts
Hoodies
Sweatshirts
Polos
Tank Tops
Accessories
Shorts & Pants
Caps
How to Format your Artwork Files for Screen Printing
Ready to move your custom apparel design idea from artwork file to fabric?
Formatting your artwork correctly is the first step to getting a high-quality print. While your print-shops department should be attentive to these details, the best way to get your design quickly onto the press and printed with the best quality image is to send your artwork in the best format.
Here are the best practices Tiny Fish Printing recommends:
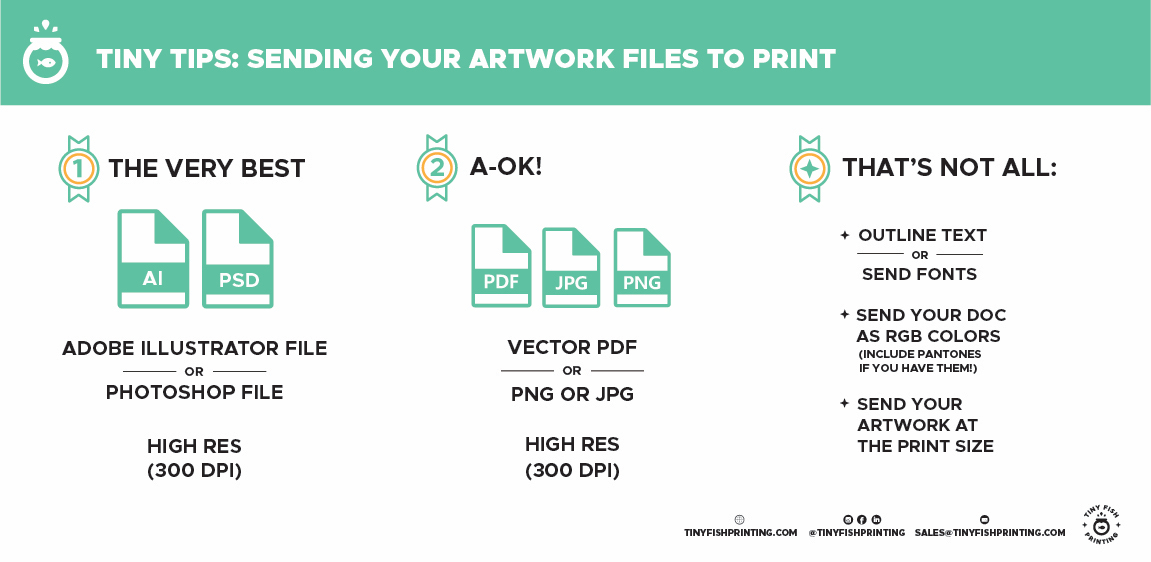
What is the best file format and resolution for your artwork?
The best file format to send your artwork in is an AI (Adobe Illustrator) file or high-resolution PSD file. This means your resolution should be at 300 DPI.
If you can’t send your artwork as an AI or high-res PDF, the next best way is a vector PDF or a high-resolution PNG or JPEG. If you send artwork files this way, make sure they are saved at 300 DPI and at the size you want your print to be. By sending the logo you want as a 3” x 3” left chest over as a 3” x 3” file, your artwork won't be pixelated being scaled up to a bigger size.
How should fonts be formatted?
Not all computers have the same fonts, especially the custom ones. When you send your file over as an AI, PDF, or PSD file and it’s opened up by your printer whose computer doesn’t have the font you used, a standard font will automatically replace it. There are easy ways to preserve the font you chose, though: outlining your text or packaging your fonts.
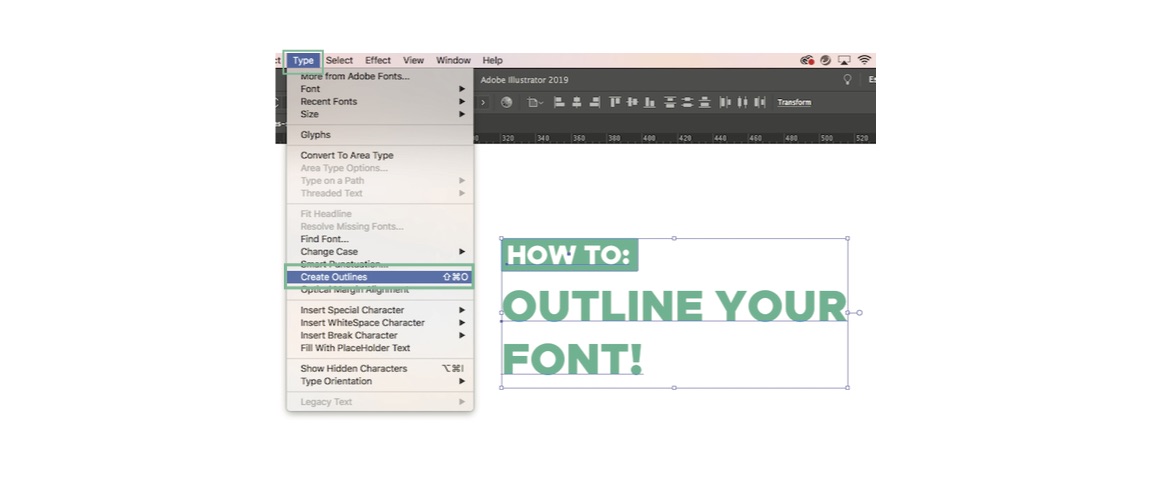
Outlining your text is the quickest way to preserve your artwork's fonts. When you outline text, you’re turning it into a vector file that can be scaled up or down and is readable even in programs that don't have your font installed.
How to outline fonts:
Select all the text in document > select “type” from the top bar of your program > select “create outlines” > save your file and you’re good to go!
Tip: You might want to save a separate file before you outline your fonts, just in case you find a typo later or want to change something in your text!
 Packaging fonts:
While outlining your fonts makes the process one step shorter for everyone, you can also attach and email your fonts along with your artwork files. You can do this by locating your computer's font book or font folder and dragging and dropping into an email. Remember to include bold and italics if you've used them in your artwork!
Keep your colors accurate:
Colors can change when converting RGB files to CMYK, so for the sake of color accuracy, RGB is the best format to send your artwork files in. To take it one step further, the ideal way to communicate colors and ensure an accurate match is to send Pantone colors along with your artwork files.
The Tiny Fish mock-up team can help you make sure your design looks its best with artwork formatting assistance and digital mock-up creation. If you have any additional questions or are ready to send that design out to print, say hey.

Don't miss out on a thing - Sign up for our newsletter to get blogs right in your inbox.